I'm going to take you step by step through the process I use to create a composite photo. Since Photoshop Elements is my software of choice for these sorts of things, that's what I'm going to be using. In Part 1 of this series I discussed ways to obtain "now" and "then" photos. Assuming you have done that, the next step is to scan them into your computer so we can work with digital images. In Part 2 I discussed a number of software programs that offer the features you'll need to create your composite image. All that's left now is to put it all together. Let's get started...
First you'll need to launch your software and open the two images you want to use. Drag and drop the "then" photo on to the "now" photo. You should end up with each photo on a separate layer in one file. Save your file under a different name than either of your original photos. Here you can see the "then" photo (layer 1) on top of the "now" (background) photo.
My "then" photo has a white border that needs to be removed. To do that, all you have to do is drag a selection (third tool down on the left in the tool pallet) around the inside edge of the white border, then go up to your menus and click on "select" and go down to "inverse" and click on that. Hit the delete key. That will remove your white border. Click anywhere on the photo (or Ctrl+D) and your selection dots will disappear.
Next you're going to adjust the opacity of the top layer (layer 1). Click on your pointer tool (top left in the tool pallet). Then look at the top of the layers pallet on the right and you'll see "opacity" with a percentage next to it. Clicking on the percentage will give you a drop down slider which will allow you to adjust the opacity. The lower the percentage the more transparent your top image will be. For this composite, I used 60%. You should play with the opacity until you get the right amount of transparency for your photos. You want to see some of the "now" photo without losing all the detailing of the "then" photo.
Next you need to reposition the top photo to where you want it. You can click on the corner boxes to resize and rotate the top image if necessary then just click and drag it into position.
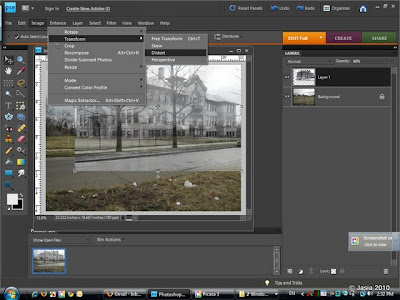
You may need to adjust certain dimensions of the photo to work with the angle of your background photo. You can do that by going to your menu items and clicking on "image","transform","distort". That will allow you to move the corners independently to adjust the viewing angle.
Once you have your "then" photo positioned where you want it and your angle adjustments made you are almost done! Save your work now (Ctrl+S). The last step is to crop out the portion of the "now" photo (the background image) that you don't need. To do this go to your menu and click on "image","crop". Then drag a box around the "then" photo. Or if a box appears just click on any of the edge or corner boxes to adjust it to the area you want to keep. When you have the crop area just the way you want it, click on the green check mark on the lower right of the image.
Now you should have your completed composite picture. Save a COPY as a .TIF file if you intend to print it or as a .JPG file if you want to put it on the web. If you close your orginal working file without saving it again you'll be able to reopen it at the pre-crop stage and make adjustments to it at a later time.
For reference, here are the two photos I started with and my final composite photograph.
Now I'll be able to go back to my blog post, Melancholy Too, and add this composite image to it. It will give me a complete set of pictures of my grandparent's neighborhood :-)
Creating a Composite Photo, Part 1
Creating a Composite Photo, Part 2


